On February 11, 2022 I officially became a U.S Citizen! 🎉 After going through the entire naturalization process I decided to write down my experience to help others who are navigating the same journey.
This post includes step-by-step details on how to file your N-400 form, current fees, links to study materials for the civics test, and what to expect during the interview and oath ceremony.
If you’re preparing to apply for U.S. citizenship, you’re in the right place! I’ll walk you through the whole process, share my personal experience, and give you tips to help make the process smoother.
Timeline Overview
Here’s a quick overview of how long the process took for me:
- Filed N-400 Application: May 16, 2021
- Received Interview Notice: December 21, 2021
- Citizenship Interview: January 18, 2022
- Oath of Allegiance: February 11, 2022
- Total time was 271 days from the filling day to the ceremony day.
➡️ Good to know: It was also during COVID times so it could have influenced the timeline.
💡 My Experience: I also had a pending I-751 – Petition to Remove Conditions on Residence (basically the second “Green Card”). Since my I-751 wasn’t resolved yet, my husband had to come with me to the interview so they could sort that out first. Thankfully, it all worked out!
STEP 1: How to file the N-400 form (Application for Naturalization)
The first step is to create a USCIS online account at “MYUSCIS” . This is where you will file your N-400, upload your documents, pay the fees, and track your case updates. You can also view copies of any letters or notifications from USCIS before they even arrive in the mail which is super convenient!
Documents you will need to apply for citizenship:
Before you start, have these documents ready:
✅ A photocopy of both sides of your Permanent Resident Card (Green Card).
✅ If your Green Card is expired, include the I-795 notice (this extends your stay while processing your case).
✅ If your legal name is different from the one on your Green Card, provide proof of the name change (marriage certificate, divorce decree, or court document).
If you’re applying based on marriage to a U.S. citizen:
✅ Your spouse’s birth certificate, Certificate of Naturalization, Certificate of Citizenship, or the inside front cover and signature page of their current U.S. passport.
✅ Your marriage certificate.
✅ Proof of shared life (e.g., tax returns for the past 3 years, joint bank statements for the past 3 months, leases, mortgages, car insurance, credit cards, etc.).
✅ Your Social Security number.
Download the USCIS official documents list HERE.
👉 Pro Tip: If you’re using an iPhone, don’t take photos of your documents but scan them instead! Open the Notes app, tap the camera icon, select “Scan Documents,” and place the document on a flat surface. This feature creates a clean, high-quality scan that’s perfect for uploading!
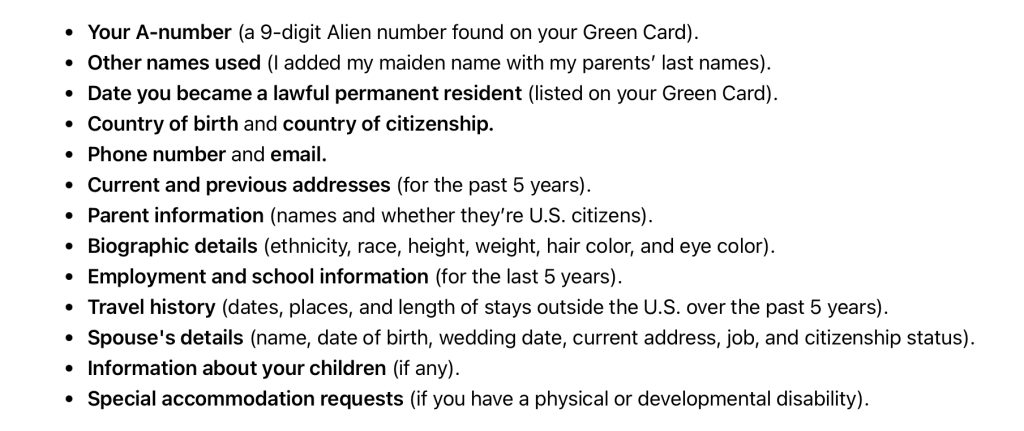
Other Information You’ll Need for the N-400:
The N-400 asks for a lot of personal details, so be ready with:
At the end of the form, you’ll answer a series of YES or NO questions like:
- “Do you owe any overdue federal, state, or local taxes?”
- “Have you ever been a member of the Communist Party?”
- “Do you support the U.S. Constitution and the U.S. government?”
➡️ Don’t stress! Just take your time and read the questions carefully. They’ll ask you these same questions again during the interview, so it’s good to be prepared.
Tracking your case
Once you’ve submitted your application, you can check your status anytime:
✅ Go to MyUSCIS
✅ Use your receipt number (13-character identifier) to track progress
STEP 2: Pay the fee: How Much Does It Cost to Apply for U.S. Citizenship?
The next step is to pay the N-400 application fee. As for March 2025, the current N-400, Application for Naturalization fee is $760 if filling the application by mail (paper) and $710 if filling online. You can pay the fee by mail with money order, personal check, or cashier’s check or by credit or debit card using the Form G-1450, Authorization for Credit Card Transactions. If you pay by check, you must make your check payable to the U.S. Department of Homeland Security.
💡 My Experience: I was able to pay everything online through the USCIS website. At that time, the total fee was $725 ($640 for the N-400 + $85 for the biometrics fee). After paying, USCIS will sent you a receipt notice, and you can also view it on your My USCIS account.
STEP 3: What to Expect During the Biometrics Appointment
After submitting your N-400, USCIS will schedule a biometrics appointment at a local Application Support Center (ASC). You’ll get a notice (Form I-797C) with the date, time, and location.
✔️ They’ll take your fingerprints, photo, and signature.
✔️ You’ll confirm that all the information in your application is correct.
✔️ The appointment usually takes 15-30 minutes.
👉 What to Bring:
✅ Appointment Notice (Form I-797C)
✅ Green Card
✅ A second form of ID (driver’s license, passport, etc.)
Once your biometrics are done, your case status will update online, and USCIS will begin background checks. This step can take a few weeks to several months, so just hang tight!
💡 My Experience: In my case, since I had already done the biometrics back when I applied for my green card, I was informed that it was “not necessary for you to appear at a USCIS Application Support Center (ASC) for a biometrics appointment.” And that the biometrics fee would not be refunded. I received the biometrics notice on May 16, 2021 and then on December 21, 2021 they updated my case status to “Interview was scheduled”. I received my letter by mail a few days later.
STEP 4: How to Study for the Civics Test (+ Free Study Materials)
This is the most nerve-wracking part for most people. Once USCIS finishes reviewing your application, you’ll get an interview appointment notice with the date, time, and location. In the USCIS website you can find study material with all the questions and answers, flash cards and pocket study guides. You can find a list of the materials to help you study for test here on the USCIS website, including versions in Spanish and other languages.
PDF Study Materials:
📌 2008 Civics Test Questions and Answers
📌 USCIS Flash Cards
📌 Civics Test MP3
📌 The USCIS Civics Test Textbook
You can also practice the test online here with multiple choices questions, or download the USCIS: Civics Test app on your phone and play with it throughout the day. There are also other apps available on App Store that can help, just search Civics Test and you’ll find them. This video explains about the naturalization process.
👉 Pro Tip: As soon as you get your interview date, start studying for the civics test! Even if you’re confident, it’s best to review so you feel fully prepared.
💡 My Experience: I received the letter in the mail in the last week of December 2021, so I had about 3 weeks to prepare for the interview and study for civics test.
What to Bring to the Citizenship Interview
✅ Interview Appointment Notice
✅ Form I-551, Permanent Resident Card (Green Card)
✅ State-issued ID (like a driver’s license)
✅ All valid and expired passports and travel documents issued to you that document your absences from the United States since becoming a permanent resident.
✅ Marriage certificate (if applying based on marriage)
✅ For a list of other documents that you may need to bring with you, read Form M-477, Document Checklist.
STEP 5: The Citizenship Interview Process
Once you arrive at the USCIS office, you’ll go through security and check in at the front desk. Then, you’ll wait until an officer calls your name.
The interview itself has three main parts:
1️⃣ Reviewing Your N-400 Application: The officer will go through your answers and ask if anything has changed. They’ll also ask some of the YES/NO questions again.
2️⃣ English Test: You’ll need to read one sentence, write one sentence, and answer simple questions in English.
3️⃣ Civics Test: The officer will ask up to 10 questions about U.S. history and government. You need to get at least 6 correct to pass.
➡️ Good news: The officer stops asking questions as soon as you get 6 correct so you might not even have to answer all 10!
My U.S. Citizenship Interview Experience
💡 My Experience: My interview was scheduled for January 17, 2022, in Durham, NC. I arrived 15 minutes early, as recommended. On the way to the entrance, a lady at a “Register to Vote” booth informed us that phones (and any electronic devices) were not allowed inside the building. So, we went back to the car to leave our phones.
Five days before the interview, they had texted and called me to let me know that my husband needed to come with me because I had a pending I-751 that needed to be resolved before proceeding with the citizenship interview.
Once we entered the building, we had to show the interview notice (letter) and our IDs before going through security. After that, they gave me a number and told us to sit down and wait to be called. We waited for about five minutes before my number was called. I was directed to an interview room with two chairs, a table, a laptop, and a printer. The interview was conducted over FaceTime for social distancing purposes.
Once seated, an officer appeared on the laptop, introduced himself, and asked us to wait for about 10 minutes while he reviewed my case. When he came back online, he asked us to raise our right hands and swear that all the information and answers provided on the form were true. He then explained that we needed to complete the I-751 process first before proceeding with the citizenship process since he had to approve the I-751 before he could approve the N-400.
He started by asking my husband to confirm some information, including his full name, date of birth, current address, and phone number. He also asked if we were still married and living together. After confirming everything, he approved the I-751, and we moved on to the citizenship process.
From that point on, I had to answer all the questions myself, but my husband was allowed to stay and listen. The officer asked me to confirm my personal information, such as my full name, date of birth, address, and phone number. He also asked about my trips outside the U.S. over the past three years and my current employment status.
Next, we moved on to the civics questions. I remember sitting there, heart pounding, hoping I wouldn’t forget any answers. He asked me six questions, and since I answered them all correctly (60%), he didn’t need to ask the remaining four (6/10). When the officer said I had passed, a wave of relief washed over me!
Here are the questions that were asked during the citizenship interview:
- Name one American Indian tribe in the United States. A: Cherokee (or other tribes)
- What did the Declaration of Independence do? A: Declared our independence from Great Britain
- Who is in charge of the executive branch? A: The President
- We elect a U.S. Representative for how many years? A: two (2)
- What is the capital of your state? A: Raleigh NC
- In what month do we vote for President? A: November
After that, he said that I had successfully completed the civics and government test. Then, he showed me a file on the screen for the reading test, which said: “GEORGE WASHINGTON WAS THE FIRST PRESIDENT.” After I read it aloud, he sent a paper to the printer in the room for the writing test. I took the paper, and he instructed me to write: “WASHINGTON WAS THE FIRST PRESIDENT.”
The final step of the interview involved answering a series of YES or NO questions. Here are some of the questions I was asked:
- “Have you ever claimed to be a U.S. citizen?”,
- “Do you owe any taxes to the federal government or to a state or local government?”
- “Have you ever been associated with or a member of the Communist Party, the Nazi Party, or a terrorist organization?”
- “Any previous arrests, citations, charges, convictions, and incarceration?”
- “Do you support the U.S. Constitution and the U.S. government?”
- “If necessary, would you be willing to defend the United States in a war?”
After that, he asked if I had any questions and then informed me that my N-400 had been approved. He said he would try to update my status on the system, and if it worked, I might be able to do the Oath of Allegiance that same day. However, the system was having trouble updating, so he told me I would receive a letter by mail soon with the date, time, and location of my ceremony.
He then sent an official note to the printer next to me, which said: “You passed the English test and the U.S. history and government test” and “Congratulations! Your application has been recommended for approval.”
STEP 6: What Happens at the Oath Ceremony
Once you pass your interview, you’ll either take the Oath of Allegiance the same day or be scheduled for a future ceremony.
✔️ You’ll check in, return your Green Card, and receive your Naturalization Certificate.
✔️ There will be a short speech and a patriotic video.
✔️ You’ll stand, raise your right hand, and take the Oath of Allegiance.
✔️ After the oath, you’re officially a U.S. citizen! 🇺🇸
💡 My Experience: My ceremony was scheduled for 10:15 am, and I arrived five minutes early. After entering the building, the security guard asked for my ceremony notice letter and an ID. They then redirected me to the ceremony room, where I had to show the letter again and hand over my green card. In exchange, they gave me a package.
The package included a “Congratulations” folder with some basic information about American rights and responsibilities, the Oath of Allegiance with “The Star-Spangled Banner” and the “Pledge of Allegiance” printed on the back, a small copy of theU.S. Constitution, a passport form, a voter registration form and a small American flag.
I was told to sit down, and there were seven other people there becoming citizens. Most of them were alone except for one lady who was with her interpreter. We were instructed to stand up, raise our right hand, and repeat after them the Oath of Allegiance.
Once we finished, they said “Congratulations!” and called us up one by one to receive our certificates. We were told to read the certificate carefully to make sure all the information was correct. After that, we were dismissed. The whole ceremony lasted about 5 to 10 minutes, super quick!
💡 Pro Tip: Double-check your Naturalization Certificate before leaving! If there are any mistakes, notify USCIS immediately.
Final Thoughts
I know the citizenship process can feel overwhelming, but take it one step at a time. If I could do it, so can you! I hope my experience helps make your journey easier.
If you have any questions, drop them in the comments or message me, I’d love to help! 💙
Congratulations on your citizenship! 🎉
Now you can register to vote and apply for a U.S. Passport. Both forms should be in the package that they gave you at the ceremony. Other things you need to update are your Social Security (SSA) and your driver’s license.
If this helped you, share it with someone who’s preparing for their citizenship!
👉 Follow me on Instagram @TravelnCoasters for more helpful tips!
PIN IT / SHARE IT